Blog is moving

My blog is moving to http://victormendonca.com/blog/. If you are looking for a specific or older post you are in the right place Otherwise check out my new page for more up to date content.

Sunday, March 31, 2013

Unity Launcher on Android

Would you like to run a Unity launcher like on your Android device? Here's an option... it's called Glovebox, and it's free (well, one version)! You can download the free version from the market here.

The free version allows you to add a limited amount of icons, while the paid lets you add unlimited icons, as well as add widgets.

Here's a video with a quick demo of the app:


And a screenshot from my mobile:


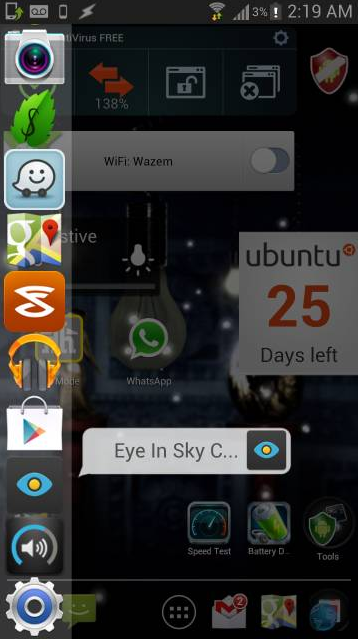
Here's a view of the bar enabled while hovering over a "Eye in Sky" widget:


And here's the widget enabled.


Monday, March 25, 2013

How to run Gnome Panels in Unity (Ubuntu 12.10)

If you are like me and can't understand why Ubuntu removed our so loved Gnome panels (taskbar), but you also enjoy some of the new features that come with Unity, here's a possible solution (I say possible because is one of many).

I opted for running both, Unity and gnome-panels at the same time. This way I can use the quick launch and search of apps and files from Unity, while also able to view running apps and the familiar menu from Gnome.

Here's what my desktop looks like. You can see my gnome-panel running on the bottom:


And here's my gnome-panel "dock" on the left (on top of my Unity launcher, but you can't see it):


And my Unity dash/launcher enabled:


This setup works pretty well as I have virtually disabled the Unity launcher to give space to my gnome-panel launcher. 

Here's how I did it.

1- Make sure you have gnome gnome-panel installed (it comes by default on 12.10):

$ dpkg -l | grep gnome-panel | awk '{print $1 , $2 , $3}'
ii gnome-panel 1:3.6.0-0ubuntu2
ii gnome-panel-data 1:3.6.0-0ubuntu2

Note: Steps 2 and 3 are only needed if you want to use a gnome-panel where the Unity launcher bar is.

2- Change the size of the Unity launcher icons to the smallest possible (System Settings => Appearance):


3- On the same window under "Behaviour", make the following changes

- Auto-hide the launcher - On
- Reveal location - Top left corner
- Reveal sensitivity - Low


With this settings your Unity launcher will only be active when using a Unity keyboard shortcut (like calling the dash, launcher or HUD).

4- Add "/usr/bin/gnome-panel" to your Startup Applications


5- Make sure you are using the Ubuntu default session (which includes Unity)

Bash tips: Use bash's built-in brace expansion to display a range of numbers

Use bash's built-in brace expansion to display a range of numbers.

So "echo {1..5}" will expand to "1 2 3 4 5".

$ echo {1..5}
1 2 3 4 5

Bash tips: Use "seq" to print a sequence of numbers with a multiplier

Use "seq" to print a sequence of numbers using a multiplier.

So "seq 0 2 10" will print "0 2 4 6 8 10":

victux@asus-linux:/tmp - :) $ seq 0 2 10
0
2
4
6
8
10

How to install Faenza icon theme on Ubuntu 12.10

Do you love the Faenza icons set from Matthieu James? Well, canonical hired Matthie last year to work on a set of icons for Ubuntu, and now you can download the Faenza icon set by adding his ppa.

sudo add-apt-repository ppa:tiheum/equinox
sudo apt-get update
sudo apt-get install faenza-icon-theme faience-icon-theme


You can find more info about Matthieu here:
https://launchpad.net/~tiheum/+archive/equinox
http://tiheum.deviantart.com/
http://design.canonical.com/author/matthieu-james/


Bash Tips: Call aliases from shell your script

Use 'shopt -s expand_aliases' from your script to expand aliases:

$ cat aliases.sh 
#!/bin/bash

alias ll='ls -lFh'
type ll


$ ./aliases.sh
./aliases.sh: line 5: type: ll: not found


$ cat aliases.sh 
#!/bin/bash

shopt -s expand_aliases
alias ll='ls -lFh'
type ll


$ ./aliases.sh 
ll is aliased to `ls -lFh'

How to disable "overlay-scrollbar" in Ubuntu 12.04 and 12.10

Here are simple steps on how to remover Ubuntu's overlay scrollbar for Ubuntu 12.04 and 12.10. Note that the steps are different for both versions.

12.04
For this version we will need to remove the package for the overlay scrollbar. Your system might have a different version. You can find what version you have with the following command:

dpkg -l | grep overlay


Then remove the following packages:

sudo apt-get remove overlay-scrollbar liboverlay-scrollbar-0.2-0 liboverlay-scrollbar3-0.2-0


12.10
For 12.10 it's just a setting that can be disabled with:

gsettings set com.canonical.desktop.interface scrollbar-mode normal


And to restore:

gsettings set com.canonical.desktop.interface scrollbar-mode overlay-auto


Fixing prey error "API key not valid! Got 401 status code"

If you are not familiar with the Prey project you can check my previous post about it here. I'll talk more about what it does and how to install.

On this post we will talk a bit about an issue during the install where you may get the error below:

== Verifying API and Device keys...

!! API key not valid! Got 401 status code.
-> Remember to check your inbox to verify your account. If you already have you should reconfigure your settings, or reinstall if necessary.

The steps below should help you with this:

1- Uninstall any previous version of Prey that you may have installed

2- Also notice that the official Ubuntu build saves the configuraiton file in "/etc/prey/config", however the latest build (as of now 0.5.9) saves the configuration file in "/usr/share/prey/config". So make sure you have configured the right file

== Verifying API and Device keys...

 ** API key is valid. Your user account is correctly set up.
 ** Device key is valid. Good. Current status is unverified.


Sunday, March 24, 2013

Elementary OS

I have just stumbled upon a new Ubuntu based distro that has a lot to promise and deserves to be mentioned, Elementary OS - http://elementaryos.org/

It has a sleek look that resembles a Mac (don't let Apple hear that), it's fast, smooth and it has a beautiful design. You can download a beta of their newest release here.

I have also added a video below so you can take a look:


Thursday, March 7, 2013

Tracking a Stolen Device with Prey Project

Prey Project (http://preyproject.com/) is an open source application that allows you to track your device (phone, laptop or tablet) in case it gets stolen. It works on multiple platforms and it's pretty easy to setup.

Here's an intro video to get you familiar:


The project provides both free and paid accounts depending on your needs... The free account is packed with features and should be more than enough for most users, however it has a limit of 3x devices.

I have set my laptop with the following settings:


And here's what my report looks like. The location was about 16Km off... but as I don't have a built-in GPS on my laptop, that is expected.


1- Installing Prey

You can install prey from the Ubuntu's official repo:

sudo apt-get install prey

Or download the deb file from their site (https://preyproject.com/download):

sudo dpkg -i prey_0.5.9-ubuntu2_all.deb


2- Getting API and Device key

a. Create an account - https://panel.preyproject.com/signup

b. Wait for the email and logon

c. Get your API Key - https://panel.preyproject.com/profile

d. Get a device key by adding a new device (here you can also set what will be monitored) - https://panel.preyproject.com/devices/new


3- Configuring the Device

a. Open the configuration file (/etc/prey/config or /usr/share/prey/config)

b. Complete the following fields
Note: use the command 'echo -n "password" | openssl enc -base64' to hash your email password

api_key='[API KEY]'
device_key='[Device KEY]'


# mailbox to send the report

mail_to='[email address to receive report]'


smtp_username='[email address to send reports]'

smtp_password='[your email password hashed]'

c. Save the file

d. Run the command below to test your configuration

sudo /usr/share/prey/prey.sh --check
sudo: unable to resolve host laptop123

 -- CHECK MODE ON.

 ## PREY 0.5.9 spreads its wings!
 ## Linux laptop123 3.5.0-25-generic #39-Ubuntu SMP Mon Feb 25 18:26:58 UTC 2013 x86_64 x86_64 x86_64 GNU/Linux
 ## Thu Mar  7 16:45:11 EST 2013

 -- Looking for connection...
 -- Got network connection!

 == Verifying Prey installation...

 -- Checking if cron daemon is running...
 -- Cron daemon found.
 -- Checking for crontab entry...
 -- Found!

 == Verifying API and Device keys...

 ** API key is valid. Your user account is correctly set up.
 ** Device key is valid. Good. Current status is missing.

e- If everything went ok, run the following command to start prey

sudo /usr/share/prey/prey.sh

You should now be able to logon to your account and see the device updated. You might want to set the device to missing in order to check the settings (just be careful with the actions part of the device configuration).